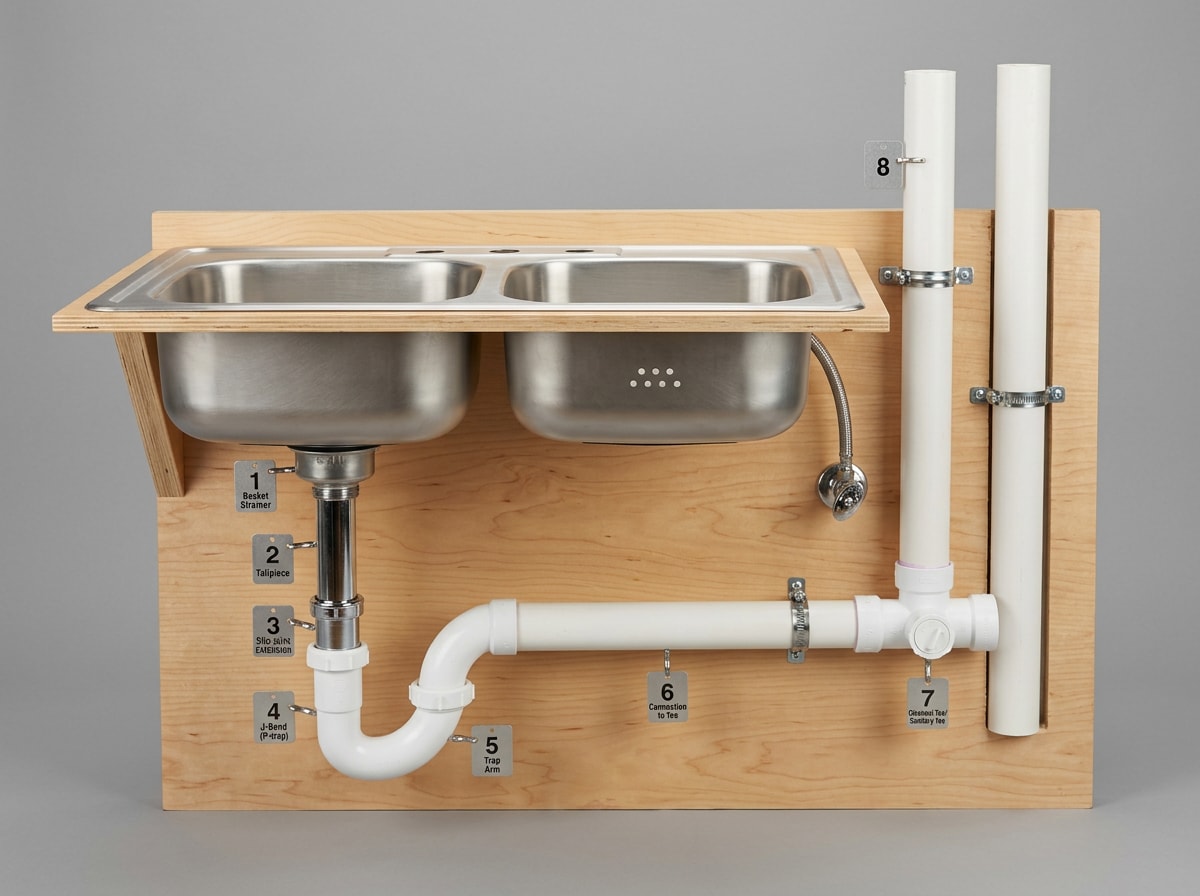
A sink plumbing diagram is just two systems sharing one cabinet: pressurized supply lines feeding the faucet, and a gravity drain carrying water away. Once you can name the parts in order, a drip stops being a mystery and becomes a part number. Start with the parts list below, then trace your own cabinet against it.
Sink Plumbing Diagram at a Glance
Every residential sink, kitchen or bath, uses the same core parts in the same order. Sizes change, the sequence does not.
| Callout | Part | What it does | Typical size |
|---|---|---|---|
| 1 | Hot and cold supply lines | Carry pressurized water to the faucet | 3/8 in. compression, 12 to 20 in. long |
| 2 | Shut-off valves (angle stops) | Isolate the fixture without killing the whole house | 1/2 in. inlet, 3/8 in. outlet |
| 3 | Faucet shanks and supply tubes | Connect the faucet body to the supply lines | Brand specific |
| 4 | Strainer or pop-up drain body | Seals the basin opening, starts the drain | 3-1/2 in. kitchen, 1-1/4 in. lav |
| 5 | Tailpiece | Vertical pipe from strainer to trap | 1-1/2 in. kitchen, 1-1/4 in. bath |
| 6 | P-trap (J-bend plus elbow) | Holds a water seal against sewer gas | Matches tailpiece |
| 7 | Trap arm | Horizontal run into the wall or floor | Sloped about 1/4 in. per foot |
| 8 | Vent | Lets air in so the trap does not siphon | 1-1/4 in. and up |
How a Sink Drain Works
Water leaves a sink in a fixed order.
It pools in the basin, passes through the strainer or stopper, drops down the tailpiece, fills the curved trap, travels along the trap arm, and empties into the branch drain inside the wall.
The supply side works the opposite way. It pushes hot and cold water up to the faucet under pressure, which is why a supply leak drips constantly while a drain leak only shows up when you run water.
That single distinction solves most under-sink confusion before you ever pick up a wrench.
Supply Side: Lines, Valves and Faucet
Water Supply Lines
Two water supply lines run from the valves up to the faucet: one hot, one cold.
Most modern installs use a braided stainless steel connector. Older and builder-grade work still shows rigid copper risers or PEX.
Typical lengths run 12 to 20 inches, with a 3/8-inch compression fitting at the valve end.
Convention puts hot on the left and cold on the right. Swap them during a faucet install and every tap in the house behaves backward, so check before you tighten anything.
Shut-Off Valves
Nearly every sink has two stops under the cabinet, one per supply line.
Older homes use multi-turn angle stops with a round handle. Newer work uses quarter-turn ball valves with a lever that travels 90 degrees from open to closed.
Valves that sit untouched for years tend to seize or weep at the packing nut. Turning them off and on once a year keeps them usable.
If your sink has no local shutoff at all, your only option is the main valve where the water line enters the house. Find it before you need it, not during a flood.
Faucet, Sprayer and Supply Tubes
The faucet drops through one or more holes in the sink deck and clamps down from below with a mounting nut or bracket.
Under the deck, each threaded faucet shank takes a supply tube, which is where the braided lines connect.
A pull-down sprayer adds two more items to the diagram: a flexible hose running down through the faucet body, and a weight clipped to that hose so the head retracts.
Single-handle models also carry a diverter cartridge inside the faucet that splits flow between the spout and the spray head. When a sprayer dribbles while the spout runs strong, that cartridge is usually the culprit, and a faucet repair is cheaper than a new faucet.
Drain Side: From Basin to Branch Drain
Sink Basin and Drain Opening
The basin holds water. The drain opening at its lowest point is where the drain assembly begins.
Kitchen basins use a standard 3-1/2 inch drain hole, which is why kitchen strainers swap across most brands.
Bathroom basins are smaller, usually around 1-1/4 inches. That difference decides which parts fit.
Strainer Basket, Flange and Locknut
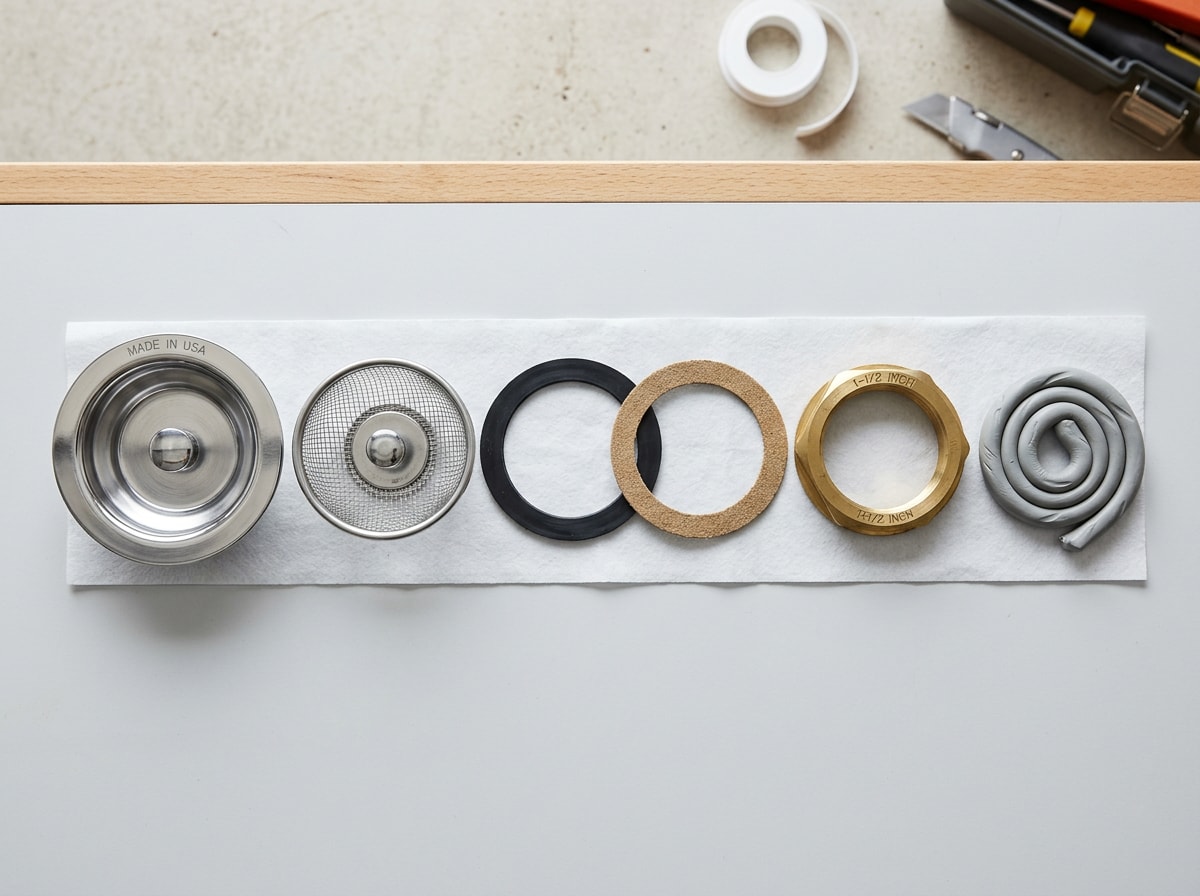
The strainer stack sits in a fixed physical order:
- The removable basket strainer drops into the sink flange.
- The flange passes down through the drain hole.
- A rubber gasket, then a fiber or metal washer, seat against the underside of the basin.
- A locknut threads up and squeezes the stack tight.
This is the joint sealed with plumber's putty, rolled into a rope and pressed under the flange lip before the locknut goes on.
It is also the single most misdiagnosed leak under a sink. Water escapes at the flange, runs down the outside of the tailpiece, and drips off the low point of the P-trap, which makes a sealed trap look guilty.
Tailpiece
The tailpiece is the straight vertical pipe running from the strainer body down to the trap.
Kitchen tailpieces are 1-1/2 inches in diameter and generally 6 to 12 inches long, joined with a slip nut and beveled washer at each end.
Deep cabinets or a low trap may call for an extension tube. If you have a garbage disposal, the disposal replaces the tailpiece entirely.
What a P-Trap Does
A P-trap is the U-shaped bend below the sink that holds a small amount of standing water.
Because the outlet side sits higher than the bottom of the bend, that water never fully drains away. The retained seal blocks sewer gas from rising through the drain into the room.
The assembly is usually a J-bend plus a waste elbow, connected with slip-joint nuts so it comes apart by hand. Some traps include a cleanout plug at the base for clearing a clog or recovering a dropped ring.
Trap seals fail in three predictable ways:
- Evaporation. A guest bath used twice a year dries out.
- Siphoning. A missing or blocked vent lets draining water pull the bend empty.
- Self-siphoning. A trap arm run too long or too steep drains itself on every use, the same flaw that pushed S-trap configurations out of new work.
Trap Arm and Waste Pipe
The trap arm is the horizontal run from the trap outlet into the wall or floor, where it meets the branch drain serving the rest of the house.
Get its geometry wrong and the trap will not hold a seal.
| Spec | Typical kitchen sink | Typical bathroom sink |
|---|---|---|
| Drain diameter | 1-1/2 in. | 1-1/4 in. |
| Slope | About 1/4 in. per foot | About 1/4 in. per foot |
| Max trap arm length before venting | Commonly around 5 ft at 1-1/2 in. | Commonly around 2-1/2 ft at 1-1/4 in. |
| Trap outlet height above floor | About 16 to 20 in. | About 16 to 20 in. |
Maximum trap arm length and trap sizing are set by code and vary by jurisdiction, so treat those figures as a starting point only. Confirm against the ICC trap and interceptor provisions and your local authority before committing to a layout.
Venting: The Half of the Diagram Nobody Sees
A drain needs air behind the water, the same way a bottle glugs when you pour it upside down. The vent supplies it.
On the diagram, the vent branches off near the trap arm, rises through the wall cavity, and exits through the roof.
Without that air, a slug of draining water pulls a partial vacuum behind it. The easiest air source becomes the trap itself, and siphoning empties the bend. You hear a gurgle, then smell the drain a few hours later.
Island sinks complicate this, since there is no wall to run a vent up. The usual workarounds are a loop vent or an air admittance valve, a one-way device that lets air in but will not let gas out.
Acceptance is jurisdiction dependent. IAPMO's own code answers for the Uniform Plumbing Code note that the UPC has not accepted air admittance valves as a general venting method, while many IPC-based jurisdictions do allow them. Check your local amendments before you buy one.
Persistent gurgling on a sink that is properly vented usually points to a partial blockage instead, which is where drain cleaning and unclogging makes sense.
Trace the Leak Before You Buy Parts
Here is the part of the diagram most homeowners skip. On the service calls our crews run around Lubbock, the drip that gets blamed on the P-trap is more often the strainer flange above it, because water tracks down the outside of the tailpiece and lets go at the lowest point it can find.
Dry every fitting with a paper towel, then run water and watch for 60 seconds. The first wet spot is the source, not the last one.
| Where you see water | Likely source | Usual fix |
|---|---|---|
| Constant drip, sink unused | Supply line or valve packing nut | Tighten or replace the connector |
| Only when the basin is filled and released | Strainer flange putty seal | Reset flange with fresh putty |
| Only while water runs, at a slip nut | Loose nut or failed beveled washer | Hand tighten, replace washer |
| Puddle at the back of the cabinet | Trap arm joint or wall connection | Reseat the joint, inspect the branch |
| Damp cabinet floor with no visible drip | Hairline crack or concealed line | Professional leak detection |
Small drips are not harmless. EPA WaterSense estimates that household leaks waste thousands of gallons per home each year, and a weeping supply connection inside a closed cabinet is exactly the kind that goes unnoticed for months.
If the wet spot turns out to be behind the wall rather than under the basin, that is kitchen plumbing repair territory, not a slip-nut fix.
Bathroom Sink Plumbing Diagram
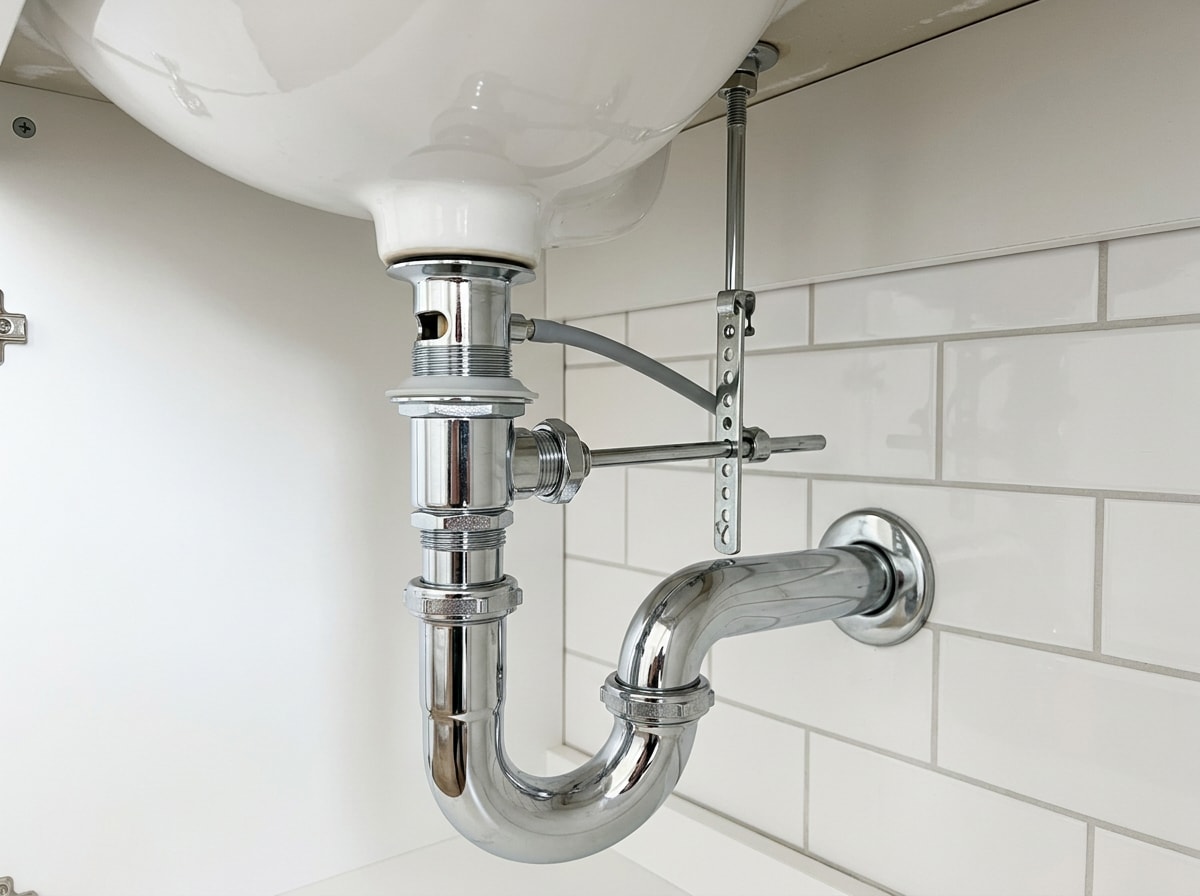
A bathroom sink shares the same trap, trap arm and vent, but everything above the tailpiece changes.
Instead of a basket strainer, lavatory sinks use a pop-up stopper seated in a drain body that threads into the basin from below.
That stopper is mechanical:
- A lift rod behind the faucet drops down and clamps to a flat perforated strip called the clevis.
- A horizontal pivot rod passes through the back of the drain body.
- The pivot rod clips into a hole in the clevis and levers the stopper up and down.
When a stopper stops sealing, the fix is almost always the clevis clip sitting in the wrong hole.
Sizes differ too. Bathroom drains run 1-1/4 inches against the kitchen's 1-1/2 inches.
Most lavatory basins also include an overflow channel cast into the porcelain, which routes water back into the drain body through a slot. That is why bathroom drain bodies have side openings kitchen strainers do not.
Garbage Disposal and Dishwasher Connections
A garbage disposal rewrites the drain half of the diagram.
It hangs from its own three-bolt mount and flange at the sink opening, replacing both the standard strainer body and the tailpiece. A discharge tube exits the side of the unit and runs horizontally into the trap inlet.
The dishwasher drain hose typically lands on the disposal's knockout inlet, or on a drain tee above the trap if there is no disposal.
Either way it needs backflow protection: a high loop fastened under the countertop, or an air gap fitting on the sink deck, depending on local code.
Manufacturer instructions such as InSinkErator's installation guidance call out the knockout plug step that trips up most first-time installs. Skip it and the dishwasher simply will not drain.
One caution: a disposal is wired equipment as well as plumbing. Cut power at the breaker before disconnecting anything, or book garbage disposal repair and let a licensed tech handle both sides.
When to Stop and Call a Plumber
Slip nuts, washers and supply connectors are fair DIY territory. These are not:
- A seized angle stop that will not close
- Water appearing at the wall or under the cabinet floor with no visible drip
- Repeated clogs in the same line after cleaning
- Any change to trap arm length, vent routing or drain size
- Sewer odor that persists after refilling the trap
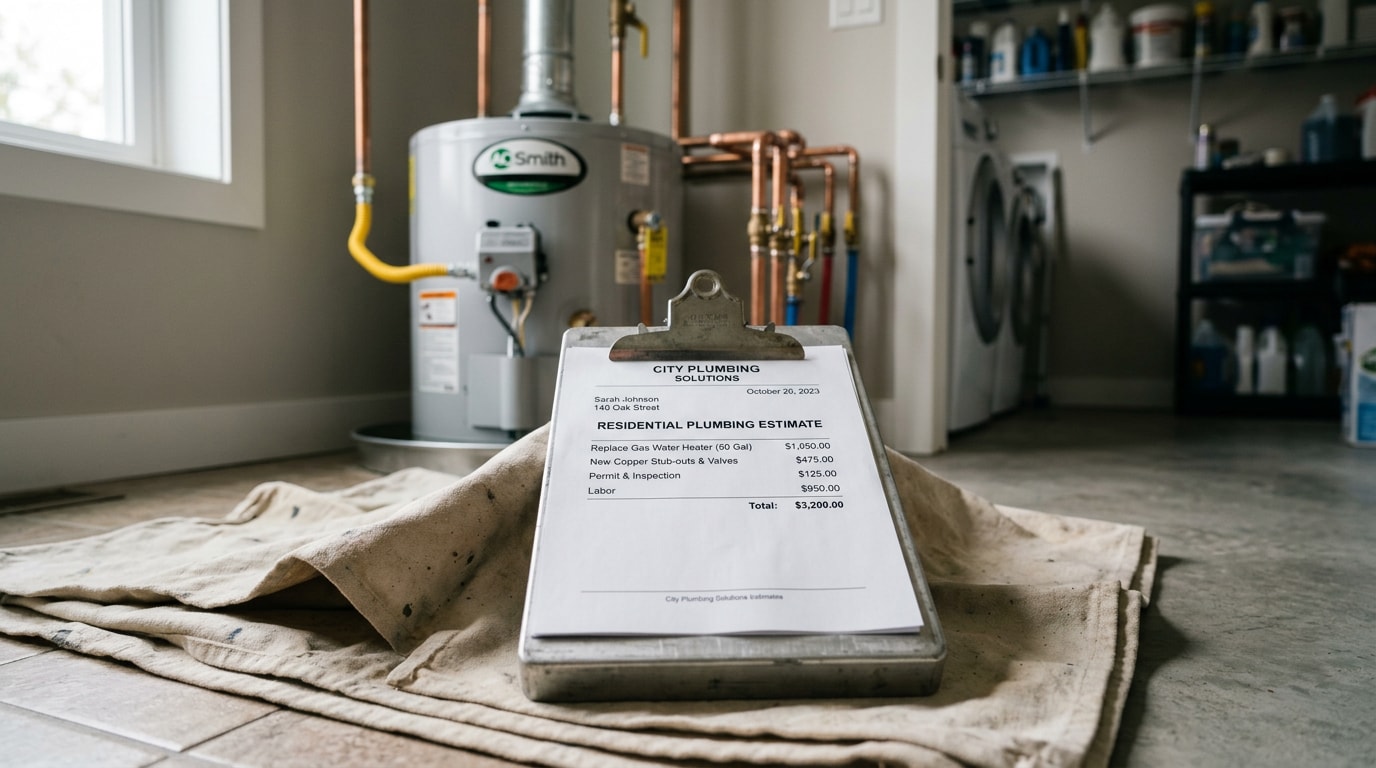
If you want a number before work starts, see how plumbing estimates actually work, then request a quote and we will scope the repair on site. You can see the range of work we handle on our plumbing services page, browse recent projects, or start from our home page if you are comparing options. We cover Lubbock, TX and the surrounding towns.
FAQ
What are the pipes under the sink called?
Collectively they are the drain assembly, or P-trap assembly. Going down from the basin: the tailpiece, the J-bend, and the trap arm that enters the wall. They connect with slip joint nuts and beveled washers, which is why they come apart by hand.
What does the U-shaped pipe under a sink do?
That is the P-trap, and it holds a water seal. Because water stays trapped in the bend, sewer gas cannot rise through the drain opening into the room. It is also where dropped rings land.
What is the difference between kitchen and bathroom sink drain plumbing?
A kitchen sink uses a basket strainer and 1-1/2 inch pipe. A bathroom sink uses a pop-up stopper linkage, 1-1/4 inch pipe and an overflow channel. The size difference means the parts are not interchangeable, and only kitchens carry disposal and dishwasher connections.
How do I shut off the water to my sink?
Turn each of the two stops under the cabinet clockwise until it stops, then open the faucet to bleed the remaining pressure. If there is no valve at the fixture, close the main shutoff. Do not force a seized multi-turn stop, because over-torquing can snap the stem and flood the cabinet.
Does every sink drain need a vent?
Yes. Every trap needs a vent to keep its seal from siphoning out. The vent can be an individual vent, a wet vent shared with another fixture, or in some jurisdictions an air admittance valve, but it cannot be nothing.
How far can the P-trap be from the sink drain?
Code limits the vertical drop from the fixture outlet to the trap weir and the horizontal trap arm length before venting is required. As a practical rule, keep the tailpiece drop short and the trap arm well under the limit for its pipe size, then verify the exact figures with your local code office.
Why does my sink smell like sewer?
Usually a dry or siphoned trap. Run water for 30 seconds and see if the odor clears. If it comes back quickly, suspect a blocked or missing vent, a leaking trap, or biofilm buildup in the drain body, and get the line inspected.
Can two sinks share one P-trap?
In many jurisdictions two bowls of the same fixture, like a double kitchen sink, can share one trap when the connection is made with a continuous waste tee within the allowed distance. Two separate fixtures generally each need their own trap. Local code governs.
Why does my sink gurgle when the washing machine drains?
That is a venting symptom. Another fixture discharging is pulling air through your sink trap. It often means a partially blocked vent stack or an undersized shared drain, and it is worth diagnosing before the trap seal empties entirely.
---
Written by the licensed plumbing crew at 1213 Plumbing, working residential and commercial service across the South Plains. Questions on your own under-sink layout? Send us photos through our contact page and we will tell you what you are looking at.